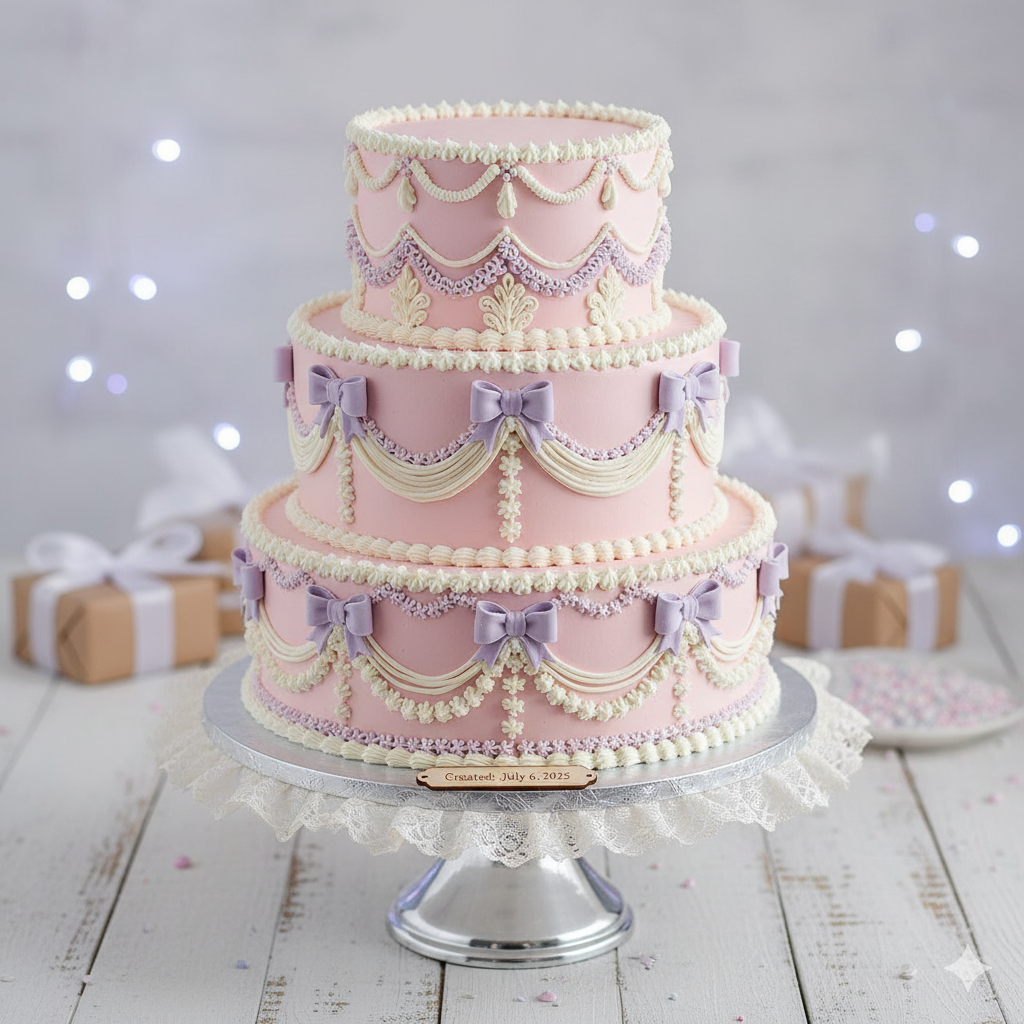
Every birthday deserves a showstopper, and for the little princess or the lover of all things charming, nothing quite captures the magic like a Birthday Cake with Bows. This isn’t just any cake; it’s a dreamy confection, perfect for a girl’s birthday, a memorable photo shoot, or simply to bring a smile to anyone’s face. We’re diving into the elegant world of Lambeth with bows and delicate cake with ruffles to create a truly beautiful cake.
Imagine a cake adorned with intricate piping, graceful swags, and, of course, darling edible bows – it’s a classic style reborn with a modern touch of sweetness. Let’s get baking and decorating!
The Recipe: Classic Vanilla Cake Base
A beautiful cake starts with a delicious foundation. This vanilla cake recipe is moist, tender, and sturdy enough to hold all our lovely decorations.
Yields: One 8-inch round, 3-layer cake
Prep time: 30 minutes
Bake time: 28-32 minutes
Ingredients:
-
2 ½ cups (300g) all-purpose flour, sifted
-
1 tbsp baking powder
-
½ tsp salt
-
1 cup (226g) unsalted butter, softened
-
2 cups (400g) granulated sugar
-
4 large eggs, room temperature
-
1 tbsp vanilla extract (good quality!)
-
1 cup (240ml) buttermilk, room temperature
Instructions:
-
Preheat & Prep: Preheat oven to 350°F (175°C). Grease and flour three 8-inch round cake pans, or line with parchment paper circles.
-
Combine Dry Ingredients: In a medium bowl, whisk together the sifted flour, baking powder, and salt. Set aside.
-
Cream Butter & Sugar: In a large bowl with an electric mixer (stand or hand-held), cream the softened butter and granulated sugar on medium-high speed until light and fluffy, about 3-5 minutes.
-
Add Eggs & Vanilla: Beat in the eggs one at a time, mixing well after each addition. Scrape down the sides of the bowl as needed. Stir in the vanilla extract.
-
Alternate Wet & Dry: With the mixer on low speed, gradually add the dry ingredients in three additions, alternating with the buttermilk in two additions. Begin and end with the dry ingredients (flour, buttermilk, flour, buttermilk, flour). Mix just until combined; do not overmix.
-
Bake: Divide the batter evenly among the prepared cake pans. Bake for 28-32 minutes, or until a wooden skewer inserted into the center comes out clean.
-
Cool: Let the cakes cool in the pans for 10-15 minutes before inverting them onto a wire rack to cool completely. This is crucial before decorating!
The Frosting: Silky Smooth American Buttercream
This buttercream is perfect for piping intricate details and holding its shape beautifully.
Yields: Enough for filling, crumb coating, and decorating an 8-inch cake
Prep time: 15 minutes
Ingredients:
-
2 cups (452g) unsalted butter, softened (but not melted!)
-
8 cups (960g) powdered sugar, sifted
-
¼ cup (60ml) heavy cream or milk, plus more if needed
-
2 tsp vanilla extract
-
Pinch of salt
-
Gel food coloring (pink, lavender, or desired bow/ruffle color)
Instructions:
-
Cream Butter: In a large bowl with an electric mixer, beat the softened butter on medium speed for 5 minutes until very pale and fluffy. This step incorporates air and ensures a light buttercream.
-
Gradually Add Sugar: With the mixer on low, gradually add the sifted powdered sugar, about 1-2 cups at a time, mixing until fully incorporated before adding more.
-
Add Liquids & Flavor: Once all the sugar is in, add the heavy cream, vanilla extract, and salt. Increase speed to medium-high and beat for another 3-5 minutes until the buttercream is light, fluffy, and smooth. If it’s too thick, add more cream a teaspoon at a time. If too thin, add a little more sifted powdered sugar.
-
Coloring: Divide a small amount (about 1-1.5 cups) of buttercream into a separate bowl for your bows and ruffles. Tint this portion with gel food coloring to your desired shade. Keep the rest white or a very pale complementary color for the main cake.
Decorating Your Lambeth Bow Cake: The Fun Part!
This is where your beautiful cake comes to life! The Lambeth method involves intricate overpiping, creating a dimensional, regal look. Adding bows makes it utterly charming.
What you’ll need:
-
Cooled cake layers
-
Prepared buttercream (white/main color and colored for details)
-
Cake turntable (highly recommended)
-
Offset spatula
-
Piping bags
-
Piping tips:
-
Round tips (Wilton 2, 3, 4 for outlines and small details)
-
Star tips (Wilton 18, 21 for borders, shells)
-
Petal tips (Wilton 101, 104 for ruffles and bows)
-
Basketweave tip (optional, for broader swags)
-
-
Small non-stick mat or parchment paper squares (for making bows ahead)
Assembly & Crumb Coat:
-
Level Cakes: If your cake layers have domes, carefully level them with a serrated knife.
-
Stack & Fill: Place one cake layer on your serving plate or cake board. Pipe a dam of buttercream around the edge, then fill with more buttercream. Repeat with the remaining layers.
-
Crumb Coat: Apply a thin, even layer of buttercream all over the cake. This traps any crumbs. Chill the cake in the refrigerator for 20-30 minutes until the crumb coat is firm.
-
Final Base Coat: Apply a thicker, smooth layer of your main buttercream color to the entire cake. Use an offset spatula and bench scraper to get sharp edges. Chill again until firm.
Creating the Bows (Optional – Make Ahead!):
Making bows separately allows them to set and gives you more control.
-
Prepare: Use a petal tip (like Wilton 104) and your colored buttercream. Practice on parchment paper first.
-
Bow Loops: Pipe a loop shape, starting thick and tapering to a point. Make 2 loops per bow.
-
Bow Tails: Pipe two ‘tails’ with a slight curve.
-
Center Knot: Pipe a small, flattened circle or ruffle for the center.
-
Assemble: Once piped, gently place them on a non-stick mat or parchment square. Freeze for 10-15 minutes until firm, then carefully assemble by pressing the loops and tails onto the center knot. Freeze again until solid.
Piping the Lambeth Details & Ruffles:
This is where the magic happens! Reference images of Lambeth cakes for inspiration.
-
Bottom Border: Start with a decorative border around the base of the cake using a star tip (Wilton 18 or 21). Shells, ropes, or beads work well.
-
Vertical Divisions: Using a small round tip (Wilton 2 or 3) and your colored buttercream, pipe thin vertical lines or delicate swags to divide the cake into sections. This creates a framework for your details.
-
Swags & Drapes: With a larger round tip or star tip, pipe graceful swags or drapes between your vertical lines. You can make them single lines or elaborate overpiped designs.
-
Ruffles: Using a petal tip (Wilton 104) with the wider end against the cake, pipe delicate cake with ruffles along borders, swags, or around the top edge. Move the tip gently back and forth while applying even pressure to create the ruffled effect.
-
Overpiping & Details: This is the hallmark of Lambeth with bows. Using smaller round tips, pipe decorative dots, scrolls, pearls, or tiny shells over your initial swags and borders. Build up layers of piping for a dimensional effect.
-
Attaching Bows: Once your cake is adorned with elegant piping and ruffles, gently press your pre-made frozen bows onto key areas – at the top of vertical swags, along the base, or where you’d like an extra pop of sweetness. If you’re piping bows directly, pipe the loops and tails onto the cake, then add a small ‘knot’ in the center.
Finishing Touches:
-
Add edible pearls, sprinkles, or a delicate shimmer dust for extra sparkle.
-
Consider a personalized cake topper to finish your beautiful cake.